My lovely friend Mel had a lovely baby, Harriet (or “MY baby” according to her big sister) and this lovely occasion called for a lovely rug!
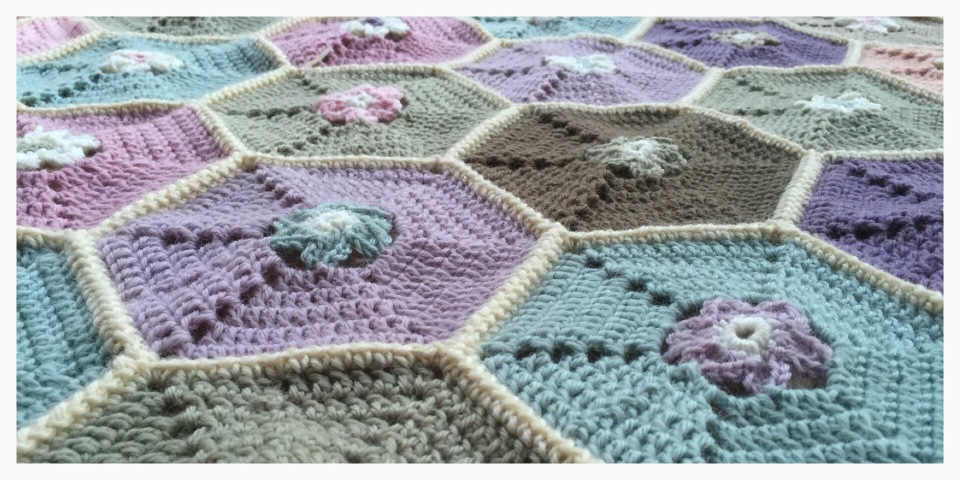
I got my initial inspiration from this stunning creation by Vanessa of the Coco Rose Diaries, & fully intended to just utilise a whole lot of scrap yarn. But then I started the first hexagons and loved the combination of the muted, vintage colours and decided to restrict it to that colour palette. Which meant I only used 3-4 colours from my own stocks and bought the rest! Oops!

I would estimate that all up the project required approximately 22 50g balls (3 of them were the beige border colour). I used machine-washable pure wool.
I spent a while trying to replicate the flower-inside-the-hexagon look …experimenting with a number of different patterns and ideas before I was happy with what I’d created.
[This blanket required 52 full hexagons and 6 half ones to complete to a cot size.]
HEXAGON PATTERN
Ch3, join with slst to create circle. Ch1, 11sc into circle. Join with slst in original chain. Fasten off.

Change yarn colour and create flower petals.
Start in any st and attach yarn. [Ch3, 2htr tog** in next st, ch3, slst in next st] 6 times ending with slst in original starting st. Fasten off.
**2htr tog = yo twice, insert hook into stitch, yo, pull through stitch, yo pull through 2 loops, yo pull through 2 loops [2 loops on hook]. Repeat [3 loops on hook]. Yo pull through all 3 loops.
Change yarn colour and create hexagon.

Start in the top st of any petal and attach yarn. [Ch5, slst in top st of next petal] 6 times ending with a slst in original starting st. Row 1 – Ch3, [2dc, ch2, 3dc] in next chain space. [3dc, ch2, 3dc] in next chain space – 5 times. 3dc in next chain space. Join with slst in top of ch3 from previous row. Row 2 – Ch3, dc in next 2 st, dc in chain space, [ch2, dc in same chain space, dc in next 6 st, dc in chain space] 5 times. Ch2, dc in same chain space, dc in next 3 st. Join with slst in top of ch3 in previous row. Row 3 – Ch3, dc in next 3 st, dc in chain space, [ch2, dc in same chain space, dc in next 8 st, dc in chain space] 5 times. Ch2, dc in same chain space, dc in next 4 st. Join with slst in top of ch3 in previous row. Row 4 – Ch3, dc in next 4 st, dc in chain space, [ch2, dc in same chain space, dc in next 10 st, dc in chain space] 5 times. Ch2, dc in same chain space, dc in next 5 st. Join with slst in top of ch3 in previous row. Row 5 – Ch3, dc in next 5 st, dc in chain space, [ch2, dc in same chain space, dc in next 12 st, dc in chain space] 5 times. Ch2, dc in same chain space, dc in next 6 st. Join with slst in top of ch3 in previous row. Fasten off yarn.
HALF HEXAGON PATTERN
Ch3, join with slst to create circle. Ch1, sc5 into circle. Fasten off with slst through circle.
Change yarn colour and create flower petals.
Start in top of ch1 and attach yarn. [Ch3, 2htr in next st, ch3, slst in next st] 3 times. Fasten off.
Change yarn colour and create hexagons.
Start in the top of the ch3 of the first petal and attach yarn. Ch3, slst in top st of next petal. [Ch5, slst in top st of next petal] 2 times. Ch3, slst in top of ch3 – turn. Row 1 – Ch3, 2dc in next chain space. [3dc, ch2, 3dc in next chai space] 2 times. 2dc in next chain space, dc in top of chain 3 – turn. Row 2 – Ch3, dc in same st, dc in next 5 st. [dc, ch2, dc] in next chain space, dc in next 6 st – twice. dc in top of chain 3. Row 3 – Ch3, dc in same st, dc in next 7 st. [dc, ch2, dc] in next chain space, dc in next 8 st – twice. dc in top of chain 3. Row 4 – Ch3, dc in same st, dc in next 9 st. [dc, ch2, dc] in next chain space, dc in next 10 st – twice. dc in top of chain 3. Row 5 – Ch3, dc in same st, dc in next 11 st. [dc, ch2, dc] in next chain space, dc in next 12 st – twice. dc in top of chain 3. Fasten off yarn.
JOINING THE HEXAGONS
I used the technique described here. It took me a little bit to get the hang of it but once I did, it came together reasonably quickly.
I’m so pleased with the end result! I love the combinations of colour and shape. It seems like Harrie loves it too! xo